Since its release in 2009, Bitcoin has evolved from a niche experiment into a global phenomenon. Many early adopters who mined or bought coins when they were worth virtually nothing eventually moved on to other things, leaving their digital wealth sitting on old hardware. Fast forward to today, and that “worthless” data could be worth a fortune – but accessing it is rarely straightforward.
Commonly, people reach out to me because they still own the original computer or laptop they used back then, but the drive has since been reformatted, wiped, or repurposed for unrelated activities. In other cases, the hardware is simply showing its age and is beginning to fail.
In such scenarios, you may wonder if it’s still possible to recover your cryptocurrencies. The answer is yes, but your mileage may vary, and a variety of technical factors will influence whether your digital assets can be successfully retrieved. If you are ready to attempt a recovery, this guide will walk you through the process.
While this guide focuses primarily on Bitcoin, it is equally valid for other assets like Litecoin, Ethereum, Dash, or Dogecoin.
How are Bitcoins stored?
Technically speaking, the Bitcoins themselves are not stored on your hard drive. Instead, what your computer actually holds is a secret, or a piece of data that authorizes you to move the associated funds by proving you are their rightful owner.
This secret typically takes the form of a private key (such as 5Kb8kLf9zgWQnogidDA76MzPL6TsZZY36hWXMssSzNydYXYB9KF)
or a seed phrase (such as circle estate expand always order umbrella tackle bonus vehicle broom quiz voice), and
it is stored within a file on your storage device. Throughout this guide, I will refer to any file containing these secrets
as a wallet file.
While wallet files differ significantly in their internal structure, they generally fall into two categories: human-readable files accessible via text editors, and machine-readable files requiring specialized software to parse.
Assessing your Bitcoin wallet recovery scenarios
Your objective is to locate your wallet files. Once you have identified them, your recovery process will depend on whether they are encrypted and whether they are corrupted. Thus, it will fall into one of the following four scenarios:
| Encrypted? | Corrupted? | Scenario |
|---|---|---|
| No | No | This is the best-case scenario, as recovery is often straightforward. |
| Yes | No | If you know the password, you are all set. If not, you will need to use password-cracking tools or services, where success is dictated by the complexity of the password and how much of it you can recall. |
| No | Yes | Your odds of success depend on the extent of the corruption within the wallet file. |
| Yes | Yes | This is a grim scenario. To recover your assets, you must deal with both data corruption and encryption. Success depends on both the level of corruption and the ability to provide or crack the password. |
It is important to remember that locating the wallet files and accessing the Bitcoins are two separate and distinct steps.
Creating a full backup of your storage device
Since we are dealing with hardware that has been reformatted or is actively failing, the first order of business is to create a byte-to-byte backup of the device, also known as a disk clone, or a disk image. By saving this backup to a separate, healthy drive, you can attempt recovery as many times as necessary without risking the original data.
If your drive is still somewhat functional, you can perform this backup yourself. However, if the hardware shows signs of severe physical degradation, it may be safer to have a professional handle the imaging process. For the purposes of this guide, we will assume you are performing the backup by yourself.
To do this, you will need a data recovery software capable of creating full disk images. While many options exist, I will be using Disk Drill as an example. Please note that I am not affiliated with the developers of Disk Drill, nor are they with me; I simply find it to be a reliable tool for this task. Other professional alternatives include DMDE or R-Studio. Most of these specialized tools require a license fee; for instance, Disk Drill Pro typically costs around $89 USD.
Step 1: Download and install Disk Drill
You can download Disk Drill directly from its official website. While a free version is available, a paid license is required to complete the full recovery process described in this guide.
Step 2: Create a byte-to-byte backup of your drive
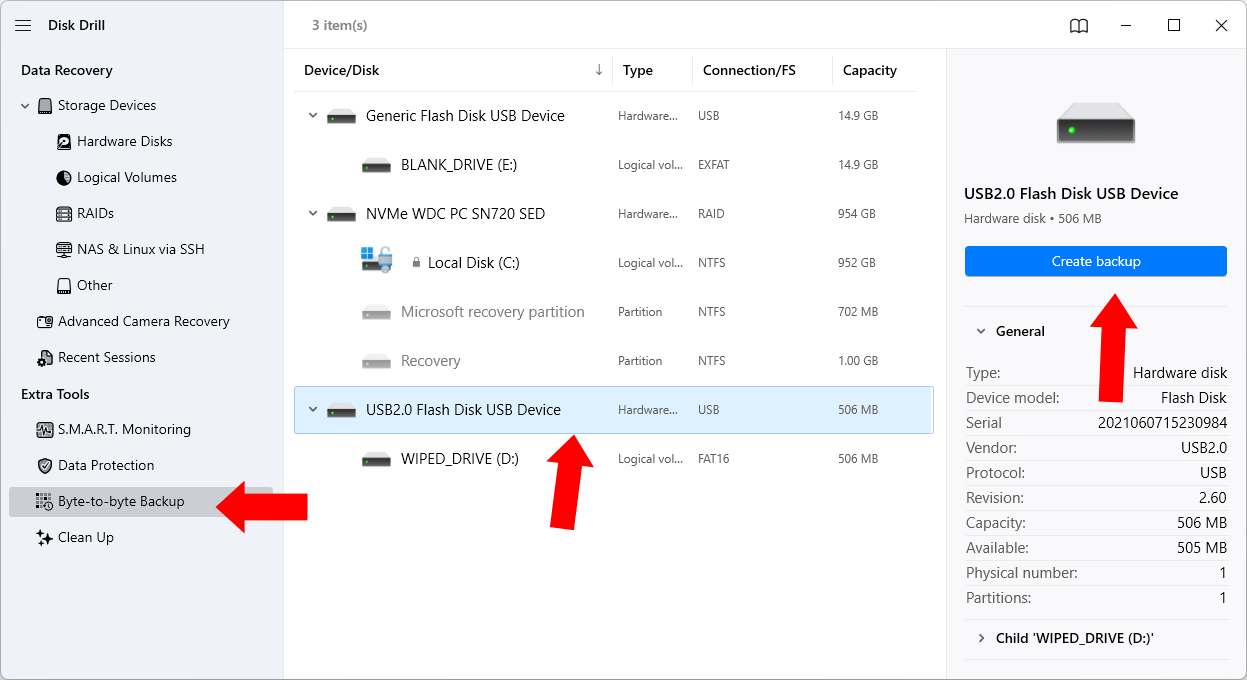
Open Disk Drill. In the left-hand panel, select Byte-to-byte Backup. In the center panel, choose the drive you wish to back up. In this example, we are selecting a USB key labeled WIPED_DRIVE. Once selected, click Create backup in the right-hand panel.
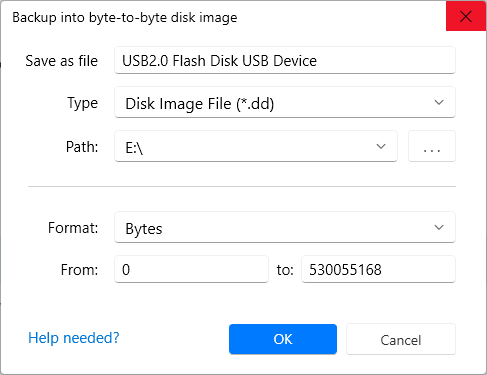
A window will appear asking where to save the backup file. You can save it to any location, provided you follow these two critical rules:
- Do not save the backup file to the same drive you are currently backing up.
- Ensure the destination drive has enough free space to hold a complete, byte-to-byte copy of the source drive.
In this example, I am saving the disk image to a separate USB key (drive E:) named BLANK_DRIVE.
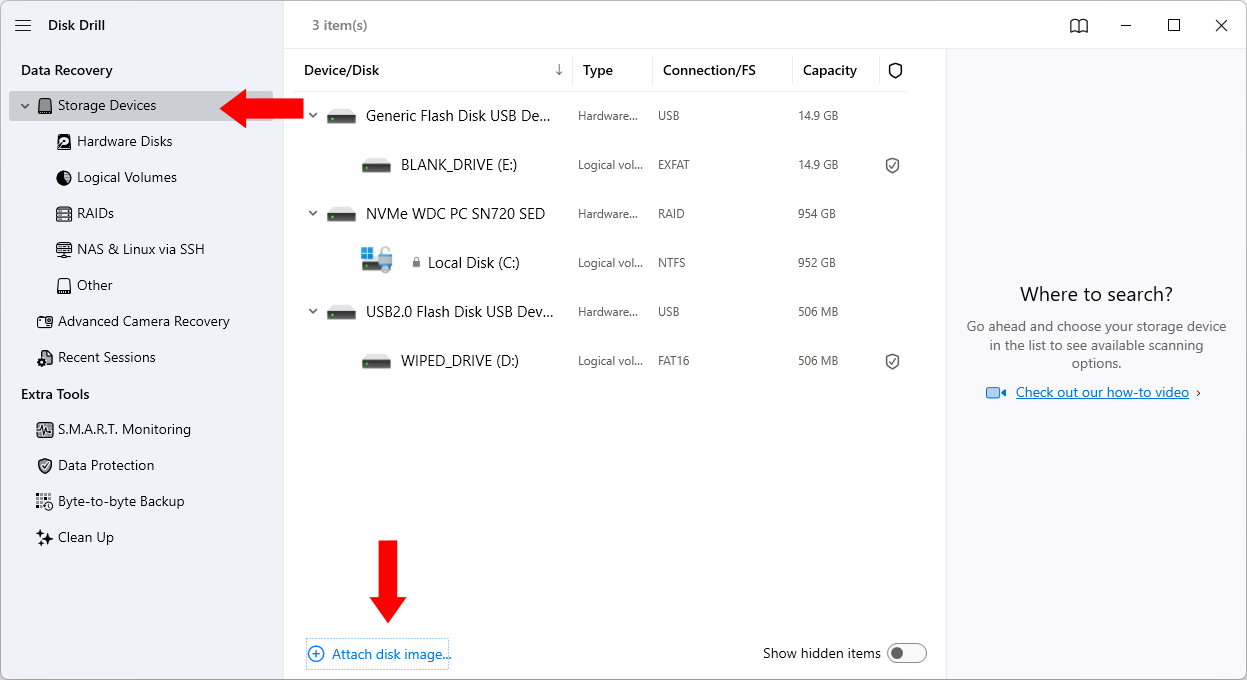
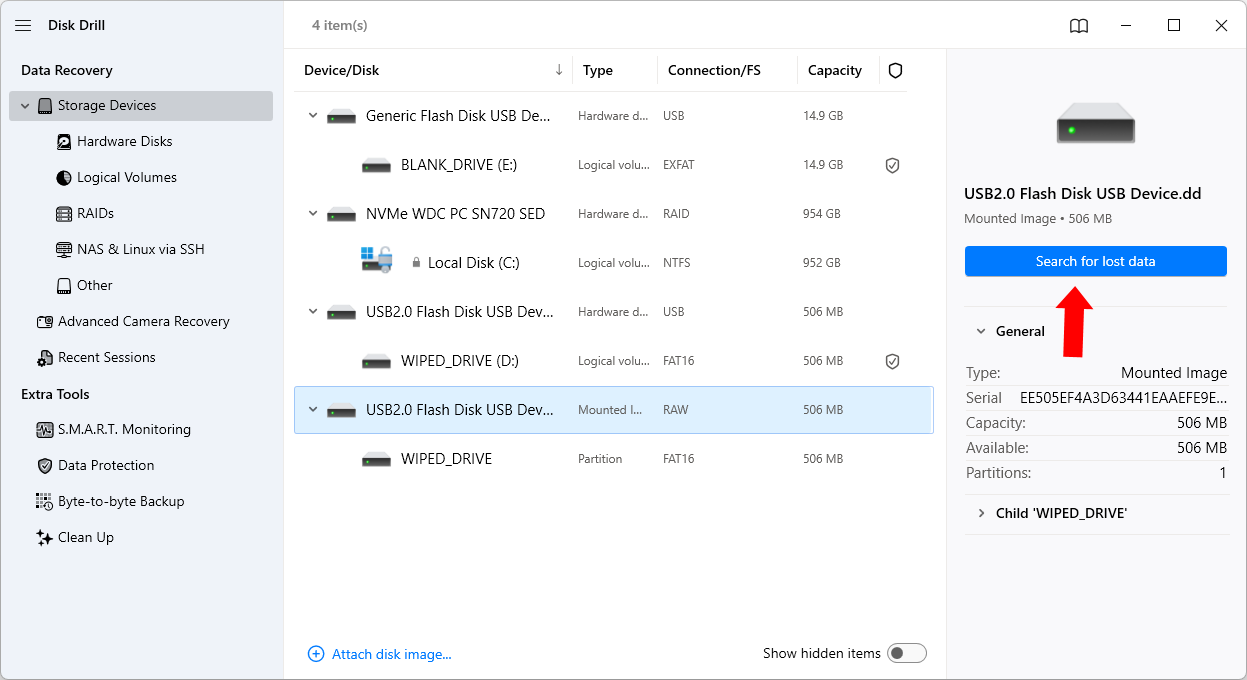
The backup process can take anywhere from a few hours to several days, depending on the size and health of the drive. Be patient and let it finish. Once complete, return to Disk Drill. Select Storage Devices in the left panel, and click Attach disk image… in the center panel.
Navigate to and select the backup file you just created.
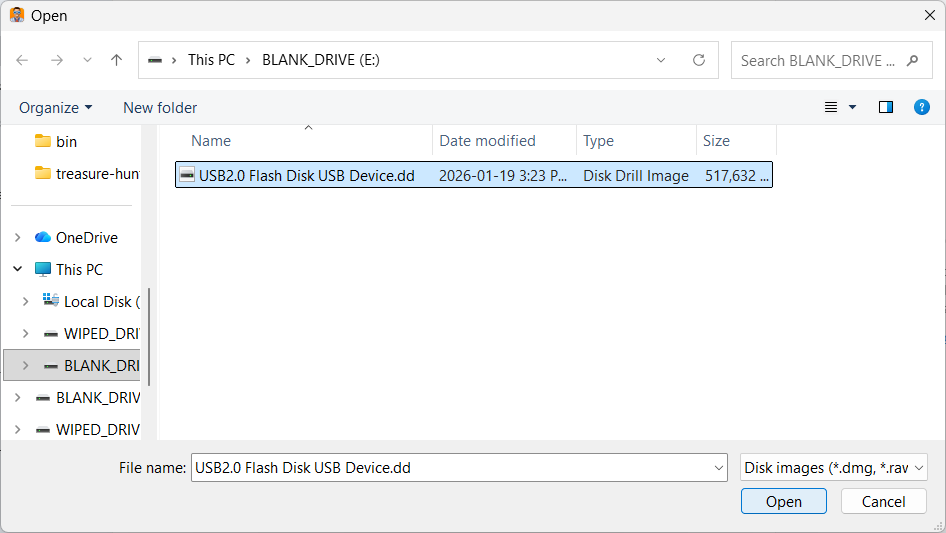
The backup should now appear in the center panel. You can verify it is the correct drive by checking the right-hand panel, where its type should be listed as Mounted Image. Click Search for lost data.
Step 3: Reconstruct a filesystem from your disk image
Disk Drill will now begin its search for lost data, a process that – much like the initial backup – may take several hours or even days to complete. It is vital to let the software finish its scan to ensure no potential wallet files are missed.
Once the scan is finished, click the Recover all… button at the top of the interface. Note that this step requires a paid Disk Drill license to proceed with the full recovery of all your files.
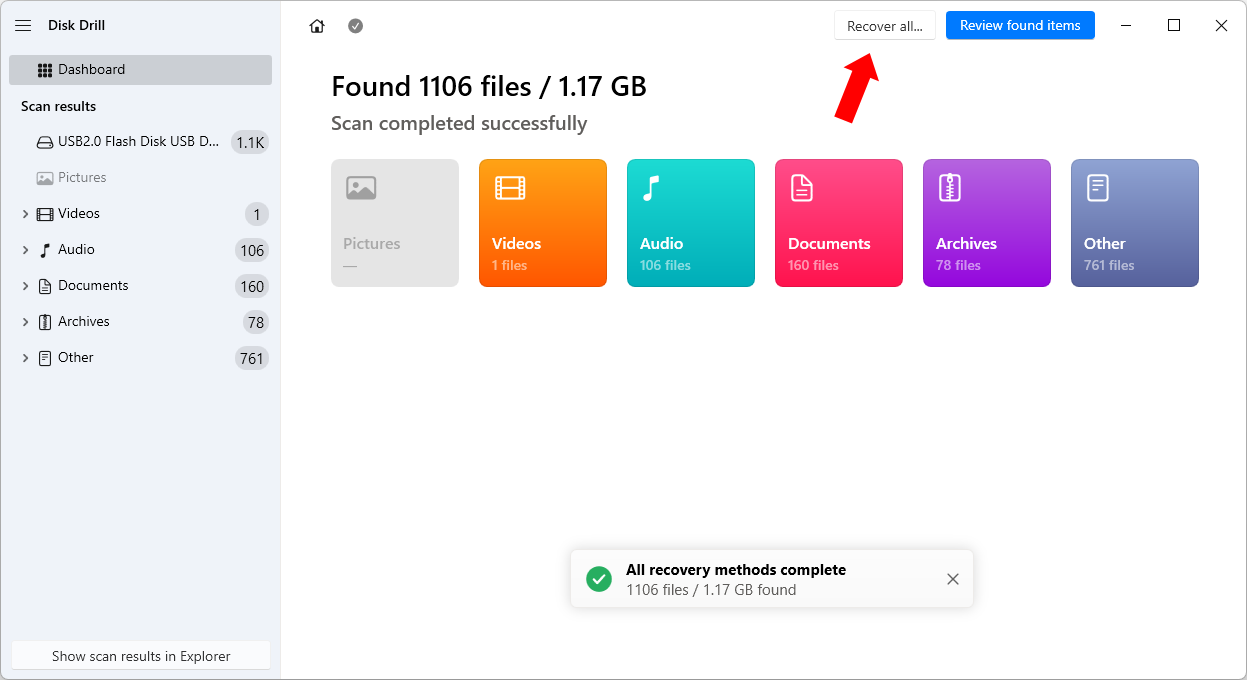
Next, you must select the destination drive where Disk Drill will reconstruct the filesystem. As with the previous steps, ensure that:
- The destination is not the original wiped or failing drive.
- The destination drive has ample free space to accommodate all recovered data.
In this example, I am selecting drive E: again and clicking Next.

This final reconstruction phase may take a few hours or days. Once the process is finished, you will finally have a stable filesystem that is ready to be analyzed for lost wallet files.
Scanning your reconstructed filesystem for lost wallet files
Now that you have successfully reconstructed a filesystem, the next step is to search it for wallet files. While you
could attempt to do this manually – for example, by searching for filenames like wallet.dat – I do not recommend this
approach. It is remarkably easy to overlook a single wallet file among a sea of data, and more importantly, many recovered
files may be corrupted, causing a manual search to fail.
Instead, you should use software specifically engineered to analyze file contents at a deep level to identify cryptocurrency data. For this, we will use my software, Treasure Hunter. Unlike standard search tools, Treasure Hunter inspects the actual data within each file, allowing it to uncover hidden, obscured, or corrupted wallets that might be missed otherwise.
How to scan your filesystem with Treasure Hunter
Once you have downloaded the software, open it. You will see the following window:
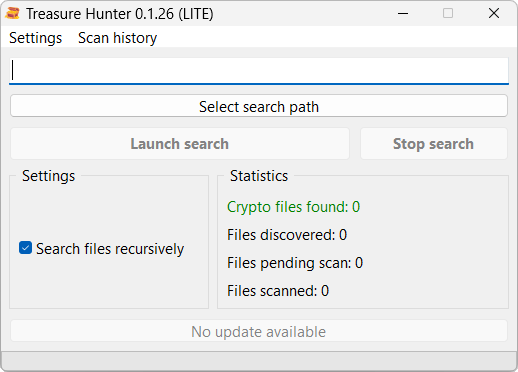
- Click Select search path.
- Select the drive containing the recreated filesystem.
- Select the Deep scan depth.
- Click Launch search to begin the analysis.
Treasure Hunter will deep scan the selected path for Bitcoin wallets. Depending on the speed of your storage device and the volume of data, this scan may take several hours to complete. Please be patient and allow the software to finish its work.
Interpreting your scan results
After the scan is complete, you will face one of two outcomes: Treasure Hunter has either successfully located wallet files, or it has not.
Treasure Hunter found wallet files
Congratulations! This is a major step forward. However, it is important to remember that Treasure Hunter is designed to locate wallet files – it does not automatically unlock or recover the funds themselves.
The ease of the final recovery now depends on the factors we discussed earlier: is the file encrypted with a password, and to what degree is the data corrupted?
If you find yourself stuck at this stage, I offer professional crypto-recovery services. I typically charge a success fee of 5% to 15% of the recovered assets, depending on the complexity of your case. I do not charge hourly rates, upfront costs, or flat fees. If I am unable to recover your coins, you don’t pay anything.
Treasure Hunter did NOT find any wallet files
If you are certain that your hard drive contains wallet files but the scan came up empty, it is possible that the level of data corruption is too severe for current detection methods.
In this situation, I recommend the following:
-
Preserve your backup: Keep a safe copy of your byte-to-byte disk image.
-
Retry later: Technology in this field moves quickly. I suggest using the latest versions of both Disk Drill and Treasure Hunter to recreate and rescan the filesystem in a few months, as new detection algorithms are frequently added.
-
Contact me: If you do not wish to wait, you can reach out to me via my contact page to request access to the latest beta version of Treasure Hunter, which often includes experimental techniques for recovering data from heavily damaged or wiped storage devices.
Final thoughts: the value of patience in recovery
Recovering lost cryptocurrency from a wiped or failing drive is rarely a “one-click” process. It is a test of patience that requires moving carefully through backups, filesystem reconstruction, and deep-level scanning. While the technical hurdles can feel overwhelming – especially when dealing with encryption or data corruption – the potential reward often makes the effort worthwhile.
If you have followed these steps and found your wallet files, you have already overcome a significant barrier: locating the data in a sea of digital noise. Whether you choose to proceed with the recovery yourself or decide to reach out for professional assistance, you are now in a much stronger position than when you started.
Remember to keep your byte-to-byte backups safe. Even if a recovery isn’t successful today, new tools and techniques are being developed constantly, and what seems lost now may very well be recoverable tomorrow.